Ideas for things to do

Making a thread to list projects I have in mind, so that I don’t spam my own other thread with irrelevant ideas. Some of these I am already doing. Some need to be done. Some are on my “one day” list.

Fan that operates when sunlight hits the area. Described here. https://stemgames.metastudio.org/t/cooling-plant-roots-when-sunlight-hits-balcony/813

Also from that thread:

And

Growing ultra-highland nepenthes in lowland conditions

I grow carnivorous plants already, this challenge is more about growing plants with specific climate requirements outside that climate and ideally acclimatizing them reliably and even breeding from them. Ultrahighland nepenthes grow in climates where daytime temperatures are around 20C-24C and nights are under 10C usually and 15C at warmest.

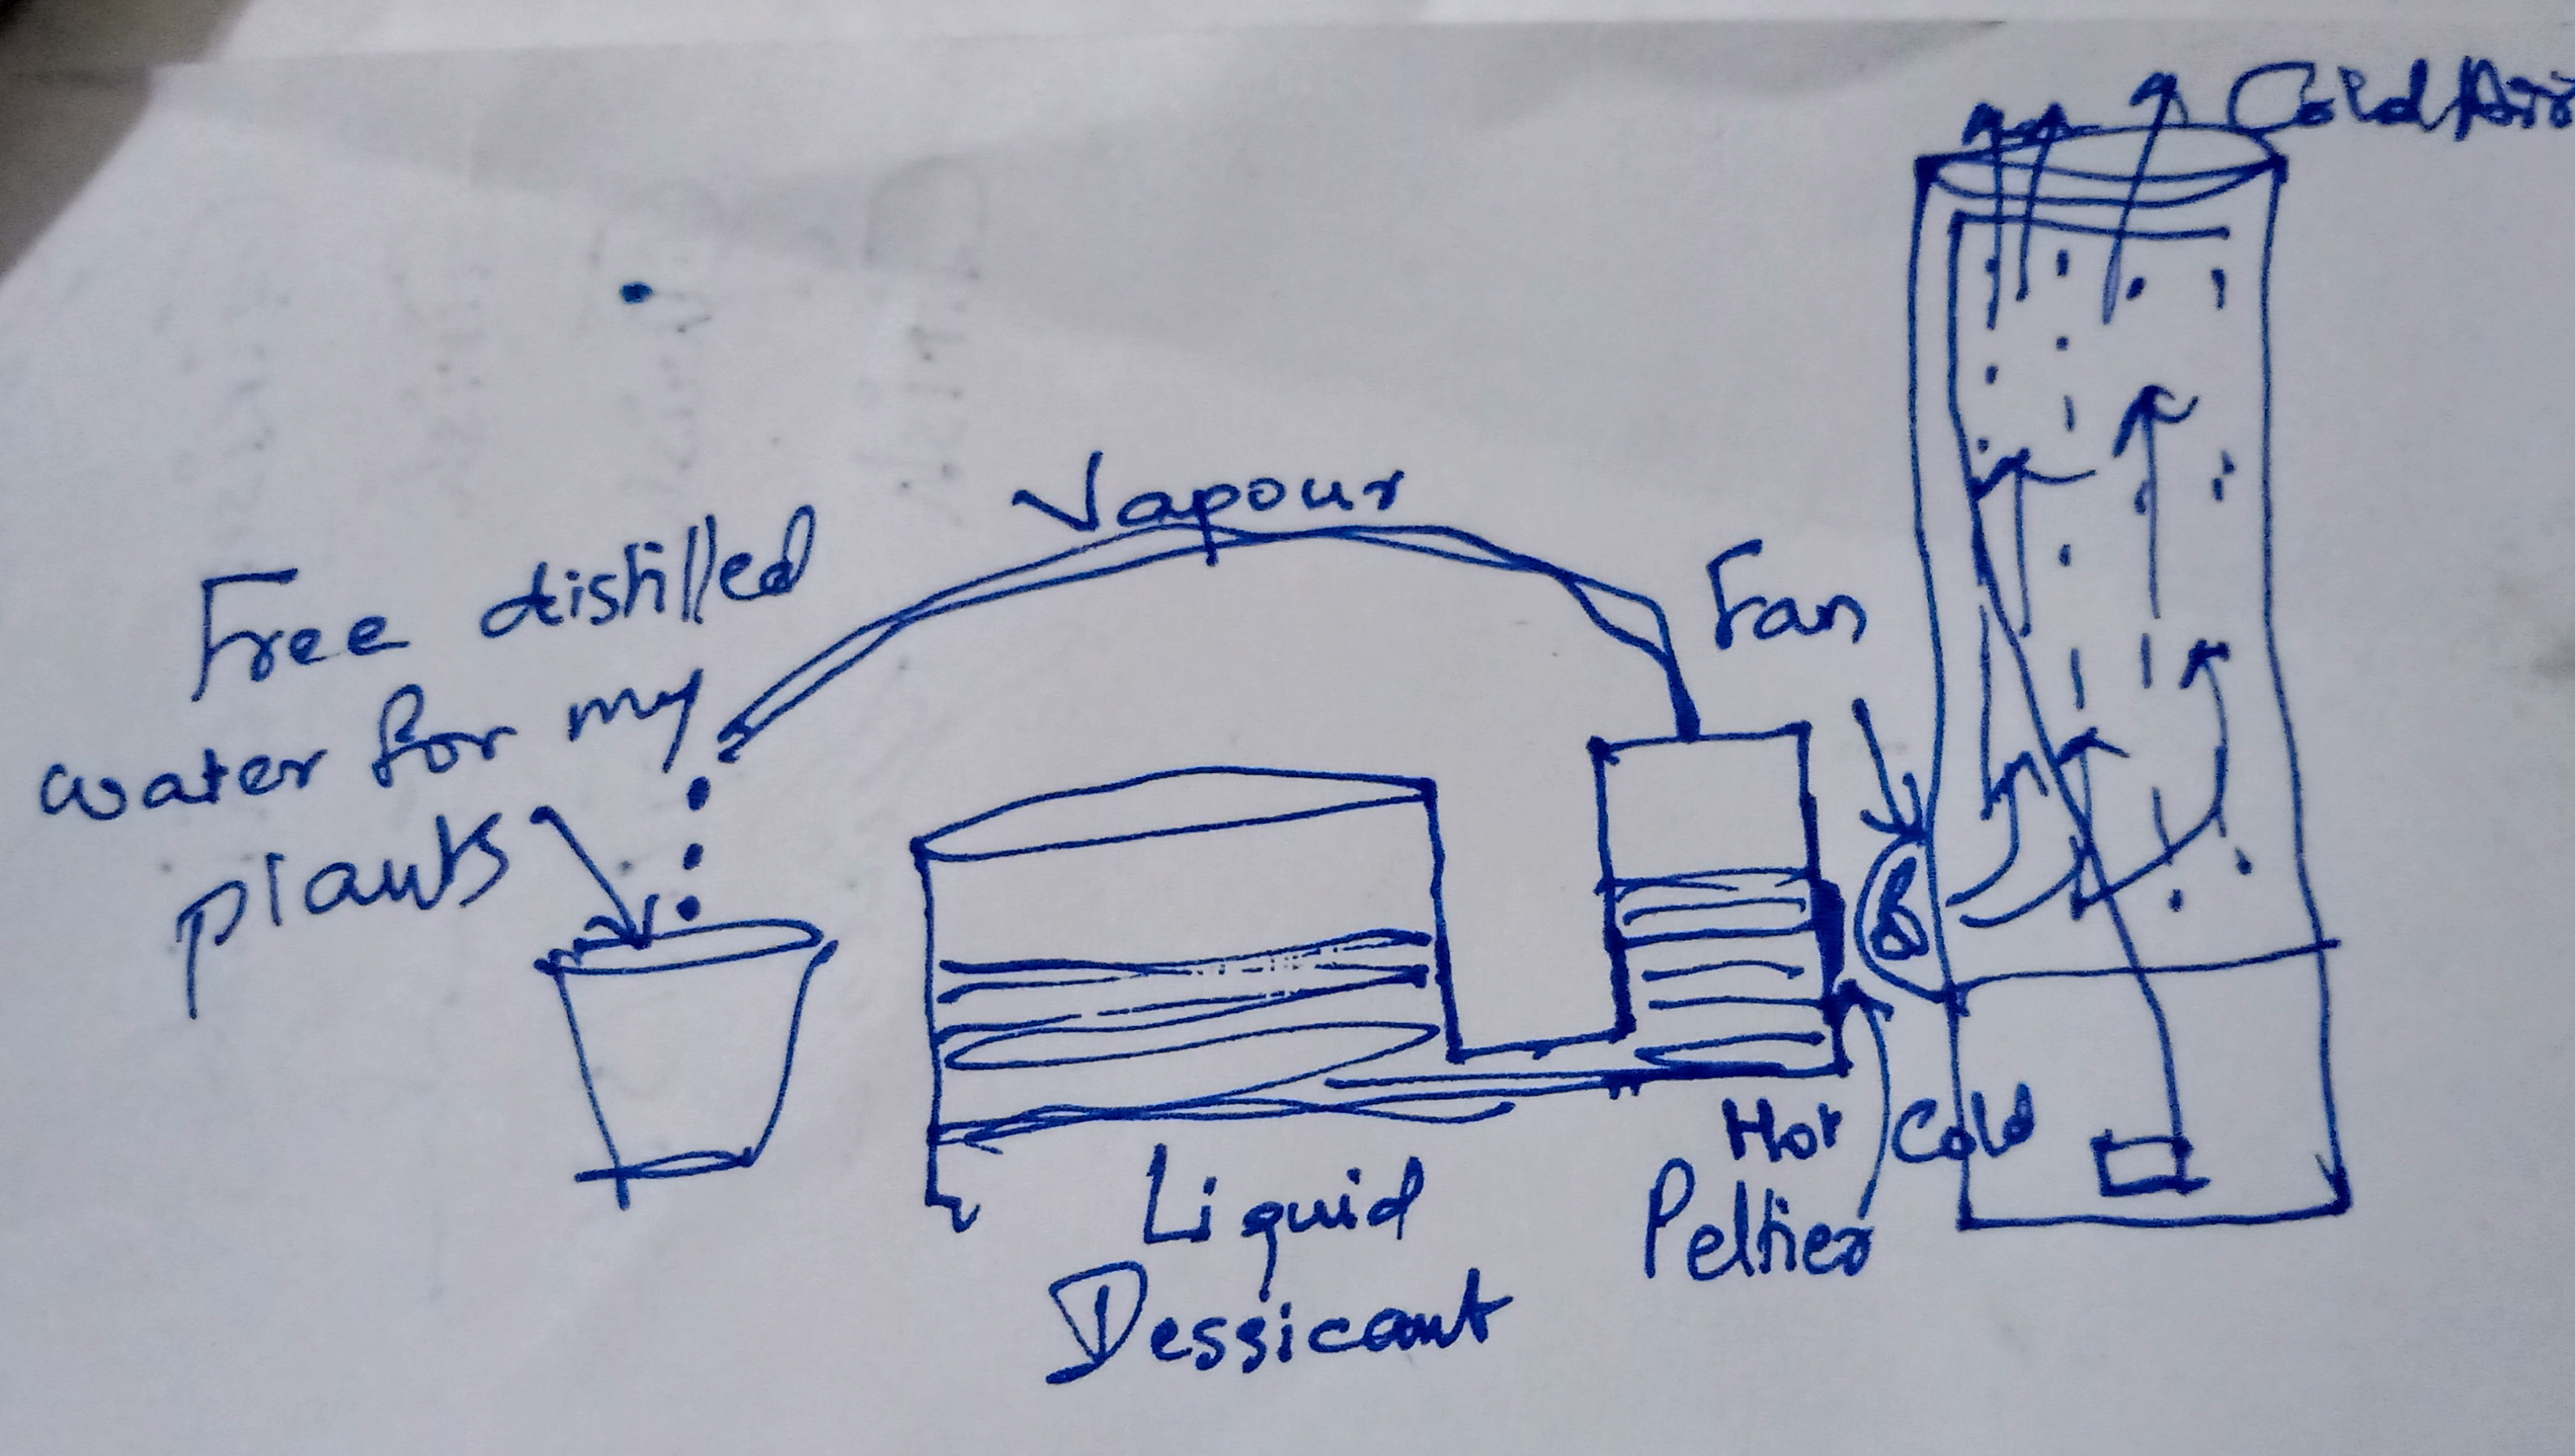
Solar cooling using a dessicant wheel

There are videos about this on youtube. But they are mostly for big units. Same with ready dessicant wheels available online. I am hoping to create something smaller that can be used by anyone.

Zeer pot marries mitti-cool fridge and has a plant cooler baby…

A zeer pot is a simple gadget made of two earthen pots that fit inside each other with a gap of a few inches, that is filled with sand and watered. Evaporative cooling drops the temperature of contents of inner pot by 10-20 degrees apparently. A mitti cool fridge also relies on evaporative cooling. A tank on the top of the fridge is basically a “matka” from which, water also drips down the sides of the fridge - the whole fridge is made of baked clay like a matka.

I want to use these ideas in some way/combination that I can cool my pots.

  1. Two pots with drain holes aligned and sealed so that the water from inner pot can flow right out and not get into the outer pot - this can be used for growing plants that need cool roots - notably the notorious drosera regia. This should be simple. Sand, some M-seal, two earthen plant pots with a few inches difference in size.

  2. The peltier cooler can be attached to a double square pot cooler to maximize evaporative cooling and increase the effectiveness of the Peltier module.

There are lots of ideas, but kid calls, gotta run. Will add more here.

3 Likes

Upgrading a water cooler for efficiency

Most water coolers we can buy on the market have a plastic or metal body and a frame on top of a water tank with a fan blowing out from one side and some material to be wetted with water to take air in through.

In my opinion, this design could be improved and/or made cheaper. My idea was for a water cooler upper frame to be designed so that a matka with water can be placed underneath to drop the pump into. Due to the matka cooling down the stored water as well, such a cooler has the potential to cool more.

Additionally, this is speculation, but… I think a cooler design could be improved by the wet material being in front of the fan rather than behind. This would probably also improve the life of the fan if it isn’t constantly pulling damp air into the working parts.

Downside: The breeze will probably have less “throw” if it has to pass through obstruction.

Another possibility could be to eliminate the evaporative pads altogether and use @jtk’s foggers in front of the fan to blow a powerful cloud of mist so that the fan isn’t pulling humid air into its working components.

What do you people think?

I have a couple of old coolers I’m happy to offer for experimenting, parts, etc.

1 Like

I also have new evaporative cooling pads of the honeycomb type or something. Supposed to be good.

1 Like

Soap moulds and cutters

This is an excellent mould and cutter set for making large batches of soap http://forcraftssake.com/shop/index.php?main_page=product_info&cPath=2_5&products_id=18

The problem? Not available in India and it can get PHENOMENALLY expensive to import. For one, the price is already too high for what it would cost, the size will make shipping expensive, and all that bill will make customs duty expensive. Not worth it.

It is a fairly simple design. Have been planning to make my own for a while. The block mould is no big deal and can probably be made with a better design. The real deal is the loaf cutter, that can take that huge chunk of soap and cut it cleanly into loaves (which further get cut into bars to make soaps of the sort that you see on my website vidyut.info). Not too complicated to make. Will take some skilled fabricating.

Repairing a multibar cutter that I already have - this is a fantastic gadget for cutting soaps into even bars. The catch - mine has got the bar where the wires attach broken. Should be a simple matter to create a replacement, I think.

Both these products are such, that if we can get a good prototype going, we can probably sell to artisan soapmakers. (actually same with the cool growing box)

For how the soap moulds and cutters work, see Cutting my Bigger Batch of Cold Process Soap (Part 2) - YouTube

Can be made quite easily.

Yeah. Just co-conspirators make it more fun. I got TONS of projects of different kinds in my head. But on my own, I got the design brain, but often lack practical fabrication or electronics skills :frowning:

I dug up an extremely complicated diagram for liquid dessicant based air conditioning that should be very economical on energy that I had from some time before. Never got around to making it, but it is too confusing to share here. Even I must draw the line at incomprehensible scribbles. Will try to make a tidier version.

2 Likes

Here is the basic idea.

Dehumidification and air conditioning using minimal electricity

There are designs for this on the internet, and frankly, it is little more than an air cooler and de-humidifier. But it is worth doing, because it seems to work at least on paper.

Beginning with the tallest chamber (which can be a wide pipe), there is a little water in the bottom and a pump taking it to the top and letting it drip down. This is as per the designs on the internet, though to me, it seems letting the water drip down a porus material may be more effective. So anyway, there is water coming down, and on the other hand, there is air being pushed up, courtesy a fan just above the water level at the bottom.

I used a peltier in this design mostly because I had one assembled and I didn’t have a fan loose. Also the design needs a source of heat to dry the dessicant. So it seemed logical to use the cold side of the peltier to give the air stream a bit of a cold boost, while solving the biggest headache of a peltier module - removing heat - by using the heat to dehydrate the liquid dessicant - which the internet appears to agree must be a calcium chloride solution for a good balance between safety and efficiency (common salt is safe but not effective, lithium chloride apparently is effective but not safe)

Coming to the hot side of the peltier, there are two chambers interconnected. One is wider and open (since I’m more low tech and passive by nature - you could pass it through air or air through it to dehumidify faster). It could contain some evaporative type material to enhance dessicant to air contact area. No point planning this. This is the sort of thing where you drop what is handy to increase the area…

The other chamber is closed and uses the hot side fo the peltier to dehydrate the dessicant and, because carnivorous plant growers can never have enough pure water, collect the distilled water for the plants.

Now looking at the bottom of the interconnected chambers. The open chamber where dessicant meets air, dessicant pulls moisture from air, which dilutes it. The dehydrating chamber removes moisture from the dessicant and concentrates it. Solutions being what they are, and the chambers being connected (can be just a tube), the two concentrations will tend to equalize, while the sytem keeps them at different levels, thus taking more and more moisture out of the air.

Note: Me being OCD low tech, the two chambers will be at the same level, reducing the headache of a pump circulating dessicant between them, then having to juggle levels of dessicant or risking the peltier blowing, etc.

That is it, I think.

2 Likes

Since actual project is 3D, we can place the chambers in a triangle, so that the dessicated air is taken in by the fan, giving it more power to pull water and get still colder.

Finally figured out the additional incomprehensible point from my original design - the chamber for heating dessicant should be metal or something suitably heat resistant.

3 Likes